iOS Project Setup Part I - Manual Integration
Let’s get started! See below for how to set up Chocolate SDK in your app.
Prerequisites
The following prerequisites must be met for integrating Chocolate SDK in iOS.
• Software Requirement: Xcode 9 or later
• Hardware Requirement: Device/simulator (with iOS 9.x or later)
Download Files
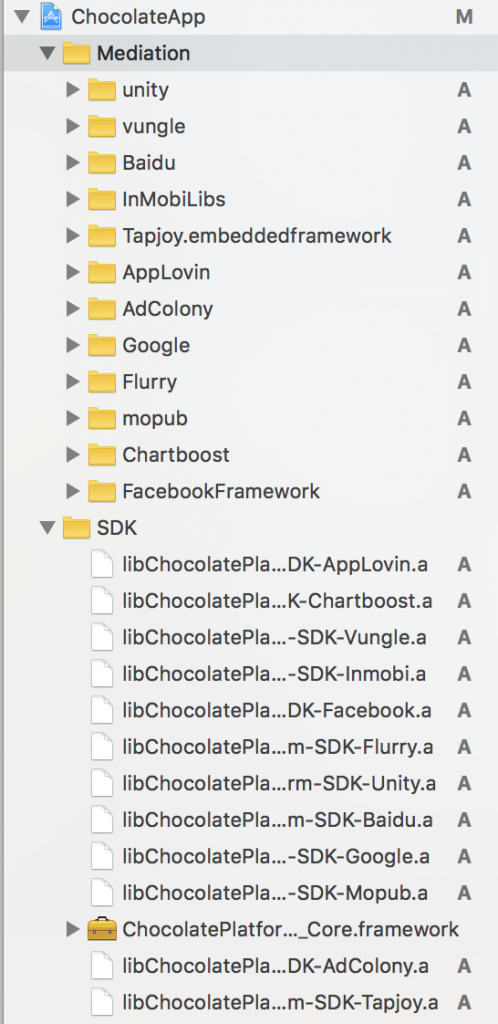
The unzipped folder contains the following two folders:
• SDK – Contains runtime library, header and SDK dependencies.
• Mediation – Contains all the partner frameworks.
Add SDK Folder to Your Project
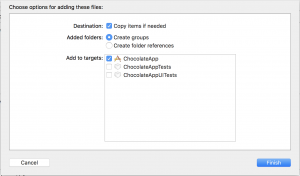
Open your project in Xcode, then drag and drop the SDK folder onto your project or workspace (use the “Project Navigator view”) and choose “Copy items into destination group’s folder” and click Finish.
Add Mediation Folder to Your Project
Drag and drop the Mediation folder onto your project or workspace (use the “Project Navigator view” and choose “Copy items into destination group’s folder” and click Finish.
Select the ad sources
a) Choose the ad sources you would like Chocolate Mediation to include. Delete the source libraries and the corresponding adapters (libraries named “libChocolatePlatform-SDK-%SOURCE_NAME%.a”) that you would like to leave out from your project. Do not remove ChocolatePlatform_SDK_Core.framework.
b) Link the project with the libz library:
i) Click on your project name under Targets section.
ii) Go to ‘Build Phases’ Tab. Open the ‘Link Binary With Libraries’ section, click the plus sign, select the following libraries, and click “Add”.
libc++.tbd
libsqlite3.0.tbd
libsqlite3.tbd
libxml2.tbd
libz.1.2.5.tbd
libz.tbd
Also, add the following system frameworks:

c) If you wish to see preroll ads from Google
i) Click on your project name under Targets section.
ii) Go to ‘General’ Tab. Under ‘Embedded Binaries’ section, add GoogleInteractiveMediaAds.framework from the Mediation/Google folder of the SDK download
iii) Add a run script phase in to run the script at Mediation/Google/strip_for_archive.sh
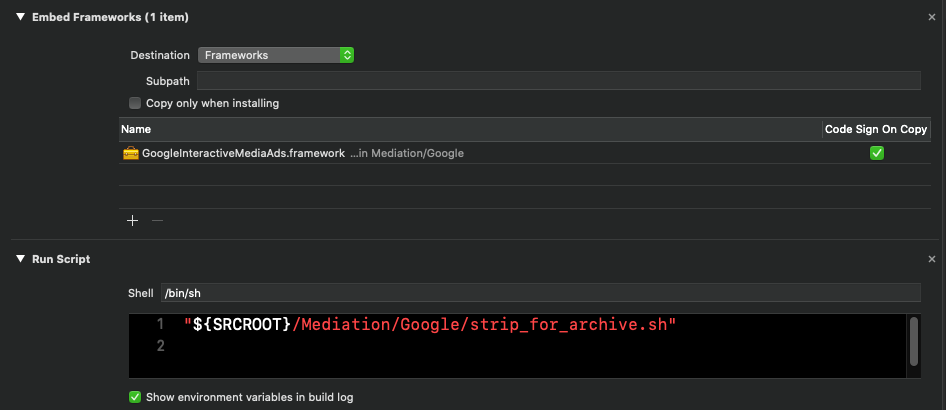
The runscript code should contain the path to the script in quotes. Usually, this would be "${SRCROOT}/Mediation/Google/strip_for_archive.sh"
Please note that this only applies to preroll ads. The more common interstitial, rewarded, and inview ads from Google are delivered via Google AdMob network, adapted for Chocolate via a separate adapter library. Unless you intend to deliver preroll ads from Google, do not include SDK/libChocolatePlatform-SDK-Google.a and Mediation/Google/GoogleInteractiveMediaAds.framework in your Xcode project.
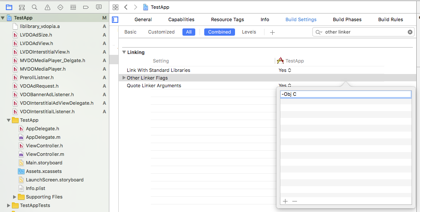
Add -ObjC to ‘Build Settings > Other Linker Flags’
a) Click on the “SampleApp” project name.
b) Click on the “Build Settings” tab and find “Other Linker Flags”.
c) Double click the entry field to the right of “Other Linker Flags” and enter “-ObjC”. It should automatically populate the Debug and Release rows.
Add optional frameworks
If you would like to include AdColony in the mediation, your app needs to link to Social, EventKit, and optionally to WatchConnectivity frameworks:

Chocolate by Vdopia iOS SDK works on iOS 9.0+ version and is compatible with both ARC and non-ARC projects.
iOS - Project Setup Part II
To use the location services which can be used to pass on the location information as part of the ad request, add a key, “NSLocationWhenInUseUsageDescription”, and set the value in string for the alert message in info.plist file of your project. Please refer to the screenshot below.

BitCode Support
Bitcode for Chocolate SDK is enabled by default. You can configure your Bitcode setting under ‘Build Settings > Build Options > Enable Bitcode’. If you wish to disable, you can set this value to ‘No’.
Using AdColony Demand SDK?
If your project doesn’t support ARC, add the following linker flag to ‘Target > Build Settings >Linking > Other Linker Flags’
-fobjc-arc (this allows AdColony to use ARC even if your project does not)
Configuring URL Schemes
With the release of iOS 9, Apple also restricted usage of the canOpenURL: API, which AdColony uses to make decisions about whether or not we can land users in certain apps from our Dynamic End Cards (DECs). In order to enable deep-linking for the apps the AdColony SDK uses, please add the following entry to your app’s plist.
<key>LSApplicationQueriesSchemes</key>
 <array>
 <string>fb</string>
 <string>instagram</string>
 <string>tumblr</string>
 <string>twitter</string>
 </array>
Configuring Privacy Controls
In iOS 10, Apple has extended the scope of its privacy controls by restricting access to features like the camera, photo library, etc. In order to prevent your app from crashing when the AdColony SDK uses these services, you will need to add the following entry to your apps plist:
<key>NSCalendarsUsageDescription</key>
<string>Adding events</string>
<key>NSPhotoLibraryUsageDescription</key>
<string>Taking selfies</string>
<key>NSCameraUsageDescription</key>
<string>Taking selfies</string>
<key>NSMotionUsageDescription </key>
<string>Interactive ad controls</string>
Mediation Partner SDK Versions
| Partner Name | SDK Version |
| AdColony | 4.1.2 |
| Amazon | 3.3.0 |
| AppLovin | 6.11.1 |
| 5.1 | |
| Flurry | 8.5.0 |
| Google AdMob | 7.53.1 |
| Google IMA | 3.11.1 |
| Mopub | 5.10.0 |
| Tapjoy | 12.4.0 |
| Unity Ads | 3.4.0 |
| Vungle | 6.4.6 |
| Criteo | 3.2.0 |
Notes
The AppLovin and Google IMA SDKs are only compatible with iOS 9.0 and above.
Google Admob SDK requires placing your Admob App ID in the iOS app’s Info.plist file under the key GADApplicationIdentifier:
![]()
Likewise, AppLovin requires placing your AppLovin SDK key in the Info.plist file under the key AppLovinSdkKey.
Chocolate SDK Initialization
Please initialize Chocolate SDK soon after the app launch – i.e. in the application:didFinishLaunchingWithOptions: method of AppDelegate.
[ChocolatePlatform initWithAdUnitID:@“API_KEY_GOES_HERE”];
Please contact Chocolate to obtain your App API key. You can contact us at sdk-support@vdopia.com
You should now be able to rebuild your project without any errors.
Ad targeting setup
You can provide the Chocolate Platform SDK information useful for targeting ads to your audience. Although this is optional, it can result in higher yield. The information used for targeting is of three types: about the user, about the location, and about the app.
Import libraries
In your app delegate, we can initialize elements needed to obtain this information, such as CoreLocation. First, we start by importing the following header files.
#import <CoreLocation/CoreLocation.h>
@import ChocolatePlatform_SDK_Core;
Declare CLLocationManager instance
@interface AppDelegate : UIResponder <UIApplicationDelegate,CLLocationManagerDelegate>
{
 CLLocationManager *locationManager;
 BOOL findLocation;
}
Use Core Location to obtain the device’s current geographic location, if you want to. Then provide it to the SDK for targeting, along with other data.
- (void)provideTargetingInfo:(CLLocation *)location{

    //Demographic data
    ChocolatePlatformDemographics *dem = [ChocolatePlatform demographics];
    [dem setBirthdayYear:1990 month:2 day:12];
    dem.gender = ChocolatePlatformGenderMale;
    dem.maritalStatus = ChocolatePlatformMaritalStatusMarried;
    dem.ethnicity = @"Asian";
    dem.age = 28;

    //location data
    ChocolatePlatformLocation *loc = [ChocolatePlatform location];
    loc.location = location;
    loc.dmacode = @"327788";
    loc.currpostal = @"122001";
    loc.postalcode = @"122016";
    loc.metro = @"XYZ";
    loc.geo = @"India:Haryana:Gurgaon";

    //app data
    // For description of the parameters, please refer to API documentation https://vdopia.atlassian.net/wiki/spaces/RC/pages/34177028/Web+Server+Ad+API+-+v1.1
    ChocolatePlatformAppInfo *ai = [ChocolatePlatform appInfo];
    ai.keywords = @[@"BOOK",@"MOVIES",@"GAMES",@"APPS"];
    ai.appDomain = @"wordswithfriends.com";
    ai.Category = @"IAB2";
    ai.requester = @"Rovio";
    ai.publisherdomain = @"rovio.com";
    ai.appStoreUrl = @"https://itunes.apple.com/";
}
Compliance with GDPR
On May 25, 2018, the EU General Data Protection Regulation (GDPR) will come into effect. IAB Europe has created a standard framework for technical compliance with this law. You can learn more here.
GDPR makes consent for collection and usage of data opt-in, requiring explicitly asking the end user for their consent and informing them of the purpose of such data collection. By default, consent will be denied, meaning only generic, not-targeted ads can be shown to users within the EU.
Obtaining consent should produce two pieces of information: a boolean flag noting whether compliance GDPR applies in the specific instance of the current user, and a consent string encoding the actual data usage permissions the user consented to. This information can then be passed on to the Chocolate Platform SDK using the ChocolatePlatformPrivacySettings class.
ChocolatePlatformPrivacySettings *priv = [ChocolatePlatform privacySettings];
[priv subjectToGDPR:YES withConsent:nil]; //passing in nil will deny consent for data usage
Where
- subjectToGDPR
- Set this to YES if the user is subject to GDPR
- Set this to NO if the user is not subject to GDPR
- withConsent
- GDPR consent string in official IAB format. nill will be interpreted as user has opted-out of all consent for all vendors.
Don’t have a CMP (consent management platform) solution yet? Don’t worry – if none of the GDPR values are configured, our mediation code will fall back to internal logic and handle the mediation in GDPR compliant way.
Example sample code
#import <CoreLocation/CoreLocation.h>
@import ChocolatePlatform_SDK_Core;
@interface AppDelegate : UIResponder <UIApplicationDelegate,CLLocationManagerDelegate>
{
 CLLocationManager *locationManager;
 BOOL findLocation;
}

@implementation AppDelegate

- (BOOL)application:(UIApplication *)application didFinishLaunchingWithOptions:(NSDictionary *)launchOptions
{
 // Override point for customization after application launch.
 [[UIApplication sharedApplication]setStatusBarHidden:YES];

findLocation = YES;
 locationManager = [[CLLocationManager alloc] init];
 locationManager.delegate = self;
 locationManager.desiredAccuracy = kCLLocationAccuracyBest;
 if ([locationManager respondsToSelector:@selector(requestWhenInUseAuthorization)]) {
 [locationManager requestWhenInUseAuthorization];
 }
 [locationManager startUpdatingLocation];
 return YES;
}

- (void)dealloc
{
 locationManager = nil;
}

#pragma mark - CLLocationManagerDelegate
- (void)locationManager:(CLLocationManager *)manager didFailWithError:(NSError *)error
{
 if (findLocation)
 {
 CLLocation *clocation = [[CLLocation alloc] initWithLatitude:0.0 longitude:0.0];
 [self performSelectorOnMainThread:@selector(provideTargetingInfo:) withObject:clocation waitUntilDone:NO];
 }
 findLocation = NO;
}

- (void)locationManager:(CLLocationManager *)manager didUpdateToLocation:(CLLocation *)newLocation fromLocation:(CLLocation *)oldLocation
{
 CLLocation *currentLocation = newLocation;

if (currentLocation != nil) {
 if (findLocation)
 {
 [self performSelectorOnMainThread:@selector(provideTargetingInfo:) withObject:currentLocation waitUntilDone:NO];
 }
 }
 else
 {
 if (findLocation)
 {
 CLLocation *clocation = [[CLLocation alloc] initWithLatitude:0.0 longitude:0.0];
 [self performSelectorOnMainThread:@selector(provideTargetingInfo:) withObject:clocation waitUntilDone:NO];
 }
 }
 findLocation = NO;
}

- (void)provideTargetingInfo:(CLLocation *)location
{
    //Demographic data
    ChocolatePlatformDemographics *dem = [ChocolatePlatform demographics];
    [dem setBirthdayYear:1990 month:2 day:12];
    dem.gender = ChocolatePlatformGenderMale;
    dem.maritalStatus = ChocolatePlatformMaritalStatusMarried;
    dem.ethnicity = @"Asian";
    dem.age = 28;

    //location data
    ChocolatePlatformLocation *loc = [ChocolatePlatform location];
    loc.location = location;
    loc.dmacode = @"327788";
    loc.currpostal = @"122001";
    loc.postalcode = @"122016";
    loc.metro = @"XYZ";
    loc.geo = @"India:Haryana:Gurgaon";

    //app data
    ChocolatePlatformAppInfo *ai = [ChocolatePlatform appInfo];
    ai.keywords = @[@"BOOK",@"MOVIES",@"GAMES",@"APPS"];
    ai.appDomain = @"wordswithfriends.com";
    ai.Category = @"BOOK";
    ai.requester = @"Kellton";
    ai.publisherdomain = @"revolutionmobile.com";
    ai.appStoreUrl = @"https://itunes.apple.com/";
}

@end
Custom segment properties
The ChocolatePlatform permits adding publisher-defined properties to be sent when making ad requests. This is done using the ChocolatePlatformCustomSegmentProperties class. Each property is a string value associated with a string key; the values of both are chosen by the publisher.
Setting a custom property
[ChocolatePlatformCustomSegmentProperties setCustomSegmentProperty:@"com.mygame.userName" with:@"Roger"]; //sets the "com.mygame.userName" property value to "Roger"
[ChocolatePlatformCustomSegmentProperties setCustomSegmentProperty:@"com.mygame.topLevel" with:@"15"]; //User "Roger" has reached level 15
Calling the setCustomSegmentProperty method on the same key with a new value overrides the existing value, and the new value will be sent subsequently. You can inspect the currently set properties.
Getting current custom property values
[ChocolatePlatformCustomSegmentProperties getCustomSegmentProperty:@"com.mygame.userName"];
[ChocolatePlatformCustomSegmentProperties getAllCustomSegmentProperties];
The getCustomSegmentProperty will return nil if the property has not been set. The getAllCustomSegmentProperties method will return an empty dictionary if no properties have been set.
Deleting custom properties
Once set, custom segment properties persist from app session to app session, unless their values are set again. To stop sending the values, the properties have to be explicitly deleted:
[ChocolatePlatformCustomSegmentProperties deleteCustomSegmentProperty:@"com.mygame.userName"];
[ChocolatePlatformCustomSegmentProperties deleteAllCustomSegmentProperties];
iOS Sample App on GitHub
A working sample app illustrating the integration and use of the SDK for all types of ad units can be found on GitHub. The SDK is integrated via the CocoaPods system, and the app is setup to display various ad units as the user chooses.
Next, let’s enable your ad unit.
Recent Changes
- New! (2/3/2020) Our AppLovin and MoPub adapters now support Banner 320×50
- Bug fix for banner ads in scroll views
- Updated to use latest versions of partner SDKs
- Now supports Banner 300×250, 320×50, 728×90 (tablet)
iOS Banner
iOS Banner Ad Unit
Our innovative Banner Ad unit instantly transforms any content wall within an app into premium video inventory. Natively integrated into publishers’ content, Banner champions the user experience with viewable and non-intrusive video advertising.
You can tap into Chocolate Exchange, Amazon, AppLovin, and Google AdMob demand.
Integration Steps
• The default banner size is 300×250 points. You can tap into Chocolate, Amazon, AppLovin, and Google AdMob demand.
• You can also set two additional sizes: 320×50 and 728×90 (only valid for tablets). You can tap into Google AdMob and Amazon demand.
Import libraries
@import ChocolatePlatform_SDK_Core;
Declare a ChocolateBannerAd instance with property in your app’s UIViewController
@property(nonatomic,strong) ChocolateBannerAd * bannerAd;
Fetch and show an ad
Note: you must initialize the Chocolate SDK with the API key provided by us, as described above. No ads will be displayed otherwise.
• Initialize ChocolateBannerAd.
• Select the adsize based on Ad type you chose (Please set this parameter only once)
• ChocolateBanner300x250 – Default size. Not setting the size parameter is equivalent to setting this
• ChocolateBanner320x50 – Small banner, will only give Google AdMob, Criteo, and Amazon ads
• ChocolateBanner728x90 – Valid for tablets only, will only give Google AdMob and Amazon ads
• Load ad
• Tell ChocolateBannerAd where to display it in your app’s view hierarchy.
Please contact Vdopia to obtain your App API key. You can contact us at sdk-support@vdopia.com
//Initialize
self.bannerAd = [[ChocolateBannerAd alloc] initWithDelegate:self];

//set size: not necessary if you want 300x250 banners
self.bannerAd.size = ChocolateBanner320x50; //small banner
Implement event listeners in your ChocolateAdDelegate
-(void)onChocolateAdLoaded:(ChocolateAd *)ad;
-(void)onChocolateAdLoadFailed:(ChocolateAd *)ad because:(ChocolateAdNoAdReason)reason;
-(void)onChocolateAdShown:(ChocolateAd *)ad;
-(void)onChocolateAdClosed:(ChocolateAd *)ad;

-(void)onChocolateAdClicked:(ChocolateAd *)ad;
Note: if you are using multiple instances of Chocolate ads (whether of the same ad unit or different ad units), make sure the callback is acting appropriately for the ad involved. The simplest way is to check the ad’s identity:
-(void)onChocolateAdLoaded:(ChocolateAd *)ad {
    if(ad == self.bannerAd) {
        //the declared banner ad is loaded
    } else {
        //another ad, process appropriately for that ad
    }
}
After receiving the onChocolateAdLoaded: callback, you can display the ad within your app at a location of your choosing:
[self.bannerAd showIn:self.view at:self.view.center];
The ad will be a subview of the view passed in to the showIn:at: method, and have its center aligned with the point passed in with respect to that view.
Example Sample Code
@import ChocolatePlatform_SDK_Core;

@interface BannerExampleViewController ()
@property(nonatomic,strong) ChocolateBannerAd *bannerAd;
@end

@implementation InViewExampleViewController
- (void)viewDidLoad {
   [super viewDidLoad];

   self.bannerAd = [[ChocolateBannerAd alloc] initWithDelegate:self];
   self.bannerAd.size = ChocolateBanner320x50; //small banner
   [self.bannerAd load];
}

#pragma mark ChocolateAdDelegate Listeners
-(void)onChocolateAdLoaded:(ChocolateAd *)ad {
   [self.bannerAd showIn:self.view at:self.view.center];
}

-(void)onChocolateAdLoadFailed:(ChocolateAd *)ad because:(ChocolateAdNoAdReason)reason {
    self.bannerAd = nil;
}
-(void)onChocolateAdShown:(ChocolateAd *)ad {}
-(void)onChocolateAdClosed:(ChocolateAd *)ad {}
-(void)onChocolateAdClicked:(ChocolateAd *)ad {}
@end
How to turn on ads on your ad unit
Please send us your sample app with the integrated code. We will help you validate the SDK setup and turn on the demand.
iOS Full Screen Interstitial
Full Screen Interstitial
Interstitial ads provide full-screen experiences, commonly incorporating rich media to offer a higher level of interactivity. Interstitials are typically shown during natural transitions in your app, e.g. after completing a game level, or while waiting for a new view to load.
Integration steps
1. Import Libraries
@import ChocolatePlatform_SDK_Core;
2. Declare a ChocolateInterstitialAd instance with property in your app’s UIViewController
@property(nonatomic,strong) ChocolateInterstitialAd *interstitial;
3. Declare ChocolateAdDelegate Instance
@interface InterstitialExampleViewController () < ChocolateAdDelegate>
4. Initialize ChocolateInterstitialAd
self.interstitial = [[ChocolateInterstitialAd alloc] initWithDelegate:self];
Note: you must initialize the Chocolate SDK with the API key provided by us, as described above. No ads will be displayed otherwise.
5. Load the ad
[self.interstitial load];
6. Implement event listeners for ChocolateAdDelegate.
# pragma mark - ChocolateAdDelegate Methods
-(void)onChocolateAdLoaded:(ChocolateAd *)ad {
   [self.interstitial showFrom:self];
}

-(void)onChocolateAdLoadFailed:(ChocolateAd *)ad because:(ChocolateAdNoAdReason)reason {
    self.interstitial = nil;
}
-(void)onChocolateAdShown:(ChocolateAd *)ad {}
-(void)onChocolateAdClosed:(ChocolateAd *)ad {
    self.interstitial = nil;
}
-(void)onChocolateAdClicked:(ChocolateAd *)ad {}
Note: if you are using multiple instances of Chocolate ads (whether of the same ad unit or different ad units), make sure the callback is acting appropriately for the ad involved. The simplest way is to check the ad’s identity:
-(void)onChocolateAdLoaded:(ChocolateAd *)ad {
    if(ad == self.interstitial) {
        //the declared interstitial ad is loaded
    } else {
        //another ad, process appropriately for that ad
    }
}
7. Show interstitial ad by calling showFrom: method.
[self.interstitial showFrom:self];
Example Sample Code
@import ChocolatePlatform_SDK_Core;

@interface InterstitialExampleViewController ()
@property(nonatomic,strong) ChocolateInterstitialAd * interstitial;
@end

@implementation InterstitialExampleViewController
- (void)viewDidLoad {
   [super viewDidLoad];

   self.interstitial = [[ChocolateInterstitialAd alloc] initWithDelegate:self];
   [self.interstitial load];
}

# pragma mark - ChocolateAdDelegate Methods
-(void)onChocolateAdLoaded:(ChocolateAd *)ad {
   [self.interstitial showFrom:self];
}

-(void)onChocolateAdLoadFailed:(ChocolateAd *)ad because:(ChocolateAdNoAdReason)reason {
    self.interstitial = nil;
}
-(void)onChocolateAdShown:(ChocolateAd *)ad {}
-(void)onChocolateAdClosed:(ChocolateAd *)ad {
    self.interstitial = nil;
}
-(void)onChocolateAdClicked:(ChocolateAd *)ad {}
@end
You can choose the view controller from which to present the ad at the time of launch:
[interstitialAd showFrom:[[[UIApplication sharedApplication] keyWindow] rootViewController]];
How to turn on ads on your ad unit
Please send us your sample app with the integrated code. We will help you validate the SDK setup and turn on the demand.
iOS Rewarded Video
Rewarded Video Ad Unit
Rewarded video ads give users the choice to watch a video ad in return for a reward, such as points, lives or free content, encouraging the user to stay in the app and driving increased ad revenue.
Rewarded video works almost identically to interstitial video.
1. Import Libraries
@import ChocolatePlatform_SDK_Core;
2. Declare a ChocolateRewardedAd instance with property in your app’s UIViewController
@property(nonatomic,strong) ChocolateRewardedAd *rewardedAd;
3. Initialize ChocolateRewardedAd
self.rewardedAd = [[ChocolateRewardedAd alloc] initWithDelegate:self];
Note: you must initialize the Chocolate SDK with the API key provided by us, as described above. No ads will be displayed otherwise.
4. Load the ad
[self.rewardedAd load];
5. Implement event listeners for ChocolateAdDelegate.
# pragma mark - ChocolateAdDelegate Methods

-(void)onChocolateAdLoaded:(ChocolateAd *)ad {}

-(void)onChocolateAdLoadFailed:(ChocolateAd *)ad because:(ChocolateAdNoAdReason)reason {}
-(void)onChocolateAdShown:(ChocolateAd *)ad {}
-(void)onChocolateAdClosed:(ChocolateAd *)ad {}

-(void)onChocolateAdFailedToStart:(ChocolateAd *)ad because:(ChocolateAdNoAdReason)reason {}
-(void)onChocolateAdReward:(NSString *)rewardName amount:(NSInteger)rewardAmount {}
6. Set the reward data
This is information about the reward the user is expected to get for viewing an ad. This information includes the following:
• Amount – Virtual Currency Amount – e.g. 10
• RewardName – Virtual Currency Name – e.g. Coins or Free Articles
• UserID – This is user ID of your user login system – e.g. Chocolate1
• SecretKey – You can get this from account manager or portal – e.g. XYZ
The data is captured in a ChocolateReward object. You first obtain a blank instance, and fill it with values, and then pass it to your ChocolateRewardedAd object:
ChocolateReward *reward = [ChocolateReward blankReward];
reward.rewardName = @"coins";
reward.rewardAmount = 10;
reward.userID = @"Chocolate1";
reward.secretKey = @"XYZ"

self.rewardedAd.reward = reward;
You need to set the reward object on the ad before you show the ad.
7. Show reward ad by calling showFrom: method
[self.rewardedAd showFrom:self];
Reward Handling
You have two options in terms of reward handling.
Server Callback
Server Callbacks allow user rewards to be sent directly from our servers to yours. Our servers send a real-time notification as soon as a reward is logged in our system. Your servers will then need to be able to process the reward as soon as it comes in, and then populate the reward out to the user.
The main benefit of server-side callbacks is that all traffic directly related to crediting the reward is completely outside the control or visibility of the user. Because there is no sensitive traffic going through the user’s device, there is less chance for fraud.

For server callback setup, please log in to portal and utilize the following resources:
• Callback Security Secret – If you want to enable verification via ‘digest’, you will need this.
• Macro Details List – Shows list of supported macros. Also find the details of ‘digest’ from here.
• Callback Tester – Use this tool to have our server ping your server to test the connectivity between our server and yours.
Client Callback
If you plan on handling the user rewarded via your own code and your systems, please choose this option. You should be able to use the callback below.
-(void)onChocolateAdReward:(NSString *)rewardName amount:(NSInteger)rewardAmount {
    //handle the reward
}
Note: if you are using multiple instances of Chocolate ads (whether of the same ad unit or different ad units), make sure the callback is acting appropriately for the ad involved. The simplest way is to check the ad’s identity:
-(void)onChocolateAdLoaded:(ChocolateAd *)ad {
    if(ad == self.rewardedAd) {
        //the declared rewarded ad is loaded
    } else {
        //another ad, process appropriately for that ad
    }
}
Example sample code
@import ChocolatePlatform_SDK_Core;

@interface RewardExampleViewController ()

@property(nonatomic,strong) ChocolateRewardedAd * rewardedAd;

@end
@implementation RewardExampleViewController
- (void)viewDidLoad {
 [super viewDidLoad];

 self.rewardedAd = [[ChocolateRewardedAd alloc] initWithDelegate:self];
 [self.rewardedAd load];
}

# pragma mark - ChocolateAdDelegate Methods

-(void)onChocolateAdLoaded:(ChocolateAd *)ad {
    ChocolateReward *reward = [ChocolateReward blankReward];
    reward.rewardName = @"coins";
    reward.rewardAmount = 10;
    reward.userID = @"Chocolate1";
    reward.secretKey = @"XYZ"

    self.rewardedAd.reward = reward;
    [self.rewardedAd showFrom:self];
}

-(void)onChocolateAdLoadFailed:(ChocolateAd *)ad because:(ChocolateAdNoAdReason)reason {}
-(void)onChocolateAdShown:(ChocolateAd *)ad {}
-(void)onChocolateAdClosed:(ChocolateAd *)ad {}

-(void)onChocolateAdFailedToStart:(ChocolateAd *)ad because:(ChocolateAdNoAdReason)reason {}
-(void)onChocolateAdReward:(NSString *)rewardName amount:(NSInteger)rewardAmount {
    NSLog(@"Received %ld %@", rewardAmount, rewardName);
    //handle reward for your app
}

@end
How to turn on ads on your ad unit
Please send us your sample app with the integrated code. We will help you validate the SDK setup and turn on the demand.
iOS Preroll
Preroll Ad Unit
Preroll ads take over existing content, playing in the same location within the app, and, if necessary, resuming the original content after the ad has completed. They’re designed to seamlessly integrate with your video content, though it is unnecessary to have such content to display preroll ads. It is up to you to decide when to interrupt your video content with an ad: before, during or after that content completes. Preroll ads self-dismiss upon completion.
You can tap into Chocolate exchange, Google, and Amazon demand.
Integration Steps
Have your own video content (Optional)
Your video content, if you have it, should be played in an AVPlayerViewController.
UIView *playerContainer = ... //where you want the video to play within your app
AVPlayerViewController *pvc = [[AVPlayerViewController alloc] init];
pvc.player = [AVPlayer playerWithURL:YOUR_CONTENT_URL];
pvc.view.frame = CGRectMake(0, 0, playerContainer.bounds.size.width, playerContainer.bounds.size.height);
[playerContainer addSubview:pvc.view];
Import libraries
In your view controller, we can initialize preroll ad. First, we start by importing the following header files.
@import ChocolatePlatform_SDK_Core;
Declare ChocolatePrerollAd instance
@interface PrerollViewController : UIViewController <ChocolateAdDelegate>
@property(strong) ChocolatePrerollAd *preroll;
@end
Fetch an Ad
Create a preroll ad providing it with the delegate object and ad size parameter:
self.preroll = [[ChocolatePrerollAd alloc] initWithDelegate:self];
[self.preroll load];
Note: you must initialize the Chocolate SDK with the API key provided by us, as described above. No ads will be displayed otherwise.
Implement ChocolateAdDelegate Methods
-(void)onChocolateAdLoaded:(ChocolateAd *)ad;
-(void)onChocolateAdLoadFailed:(ChocolateAd *)ad because:(ChocolateAdNoAdReason)reason;
-(void)onChocolateAdShown:(ChocolateAd *)ad;
-(void)onChocolateAdClosed:(ChocolateAd *)ad;

-(void)onChocolateAdClicked:(ChocolateAd *)ad;
-(void)onChocolateAdFailedToStart:(ChocolateAd *)ad because:(ChocolateAdNoAdReason)reason;
Show the ad
After you receive the onChocolateAdLoaded: callback, you can show the ad, either on top of your video content:
[self.preroll showOnPlayer:self.pvc];
The ad will interrupt the currently playing content, play on top of the video player, and resume the player’s content after it completes.
You can also show the preroll ad in a location of your choice within your app’s view hierarchy:
[self.preroll showIn:self.view at:self.view.center];
The ad will be a subview of the view passed in to the showIn:at: method, and have its center aligned with the point passed in with respect to that view.
Example Sample Code
@import ChocolatePlatform_SDK_Core;
@import AVKit;

static NSString *CONTENT = @"https://www.sample-videos.com/video123/mp4/720/big_buck_bunny_720p_30mb.mp4";

@interface PrerollViewController ()  {
    IBOutlet UIButton *playControl;
    IBOutlet UIView *playerContainer;
}

@property AVPlayerViewController *pvc;
@property ChocolatePrerollAd *ad;


@end

@implementation PrerollViewController

- (void)viewDidLoad {
    [super viewDidLoad];
    // Do any additional setup after loading the view from its nib.
    self.pvc = [[AVPlayerViewController alloc] init];
    self.pvc.player = [AVPlayer playerWithURL:[self sampleContentVideo]];
    self.pvc.view.frame = CGRectMake(0, 0, playerContainer.bounds.size.width, playerContainer.bounds.size.height);
    [playerContainer addSubview:pvc.view];

    self.pvc.player.actionAtItemEnd = AVPlayerActionAtItemEndNone;
    self.pvc.showsPlaybackControls = NO;

    playControl.enabled = NO;

    [[NSNotificationCenter defaultCenter] addObserver:self
                                             selector:@selector(mainContentDone:)
                                                 name:AVPlayerItemDidPlayToEndTimeNotification
                                               object:[pvc.player currentItem]];
    self.ad = [[ChocolatePrerollAd alloc] initWithDelegate:self];
    [self.ad load];
}

#pragma mark - UI

-(void)viewDidAppear:(BOOL)animated {
    [self.pvc.player play];
}

-(void)viewWillDisappear:(BOOL)animated {
    [self.pvc.player pause];
}

-(IBAction)playAd:(id)sender {
    [self.ad showOnPlayer:pvc];
}

- (void)mainContentDone:(NSNotification *)notification {
    AVPlayerItem *p = [notification object];
    [p seekToTime:kCMTimeZero];
}

-(NSURL *)sampleContentVideo {
    return [NSURL URLWithString:CONTENT];
}

#pragma mark - preroll ad delegate

-(void)onChocolateAdLoaded:(ChocolateAd *)ad {
    playControl.enabled = YES;
}

-(void)onChocolateAdLoadFailed:(ChocolateAd *)ad because:(ChocolateAdNoAdReason)reason {}

-(void)onChocolateAdShown:(ChocolateAd *)ad {}

-(void)onChocolateAdClosed:(ChocolateAd *)ad {
    playControl.enabled = NO;
    [self.ad load];
}

-(void)onChocolateAdClicked:(ChocolateAd *)ad {}

-(void)onChocolateAdFailedToStart:(ChocolateAd *)ad because:(ChocolateAdNoAdReason)reason {}

@end
How to turn on ads on your ad unit
Please send us your sample app with the integrated code. We will help you validate the SDK setup and turn on the demand.